Grateful for Everything
I am so excited to share today's cards with you today! I have been working on my Copic coloring and wanted to show you this beautiful stamp and die set, Grateful for Everything by Concord & 9th. I wanted to do a "practice" and then a "real thing" side by side, but I ended up liking them both for different reasons, so I included both.

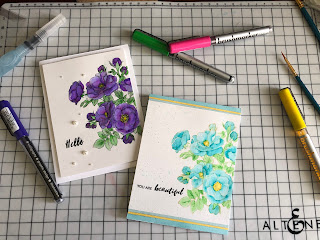
I started by stamping the main image on Xpressit Blend white card stock in Whisper Gina K Designs Amalgam ink. I colored the flowers (Peonies?) with Copic RV69, R59, R39, R37, R35. It is not your imagination that the flower on the right is lighter. I added a little RV19 to brighten it up. I love love love the detail and dimension came out! Then I dripped water on the card, which smeared one image. I'm not one to waste a little "oopsie", and I figured I would cover it somehow, so I moved on.

The next step was the leaves. For the larger leaves I used YG17, YG15, and YG11. The small leaves were done with YG67, YG63 and YG61. Its amazing how two different projects done minutes apart can look so different. When I decided to quit "messing" I moved on.

The leaves are colored with YR07, YR23, Y35, Y15, and Y13 I added a little W4 to create some depth and it came out WAY darker than I intended so I used a much lighter touch on the other.

The wheat was a little tricky. I colored them with E35, E33 and E31, but they were lost on the page so I outlined them with Stampin' Write Sahara Sand. Also seen here: a peek at my test color panel!

You might have noticed in the previous picture that I colored the berries with the same reds as the flower, but they didn't stand out enough for me so I pulled out BV17 and BV13. Note to self: when you get a new Copic Marker, always test it out before using on your project. The BV17 bled a pool on the paper and no amount of colorless blender could hide it. So I decided to do the sentiment in two different ways - one using the beautifully scripted die set in a gold metallic paper and one embossed in gold on vellum. The vellum was intended to hide the purple color burst, but the sentiment seemed hidden in the floral design so I had to find another option.
To pick the color to use as a background, I pulled out Stampin' Up card stock in Merry Merlot, Cherry Cobbler, Real Red and Riding Hood Red (yep, I keep retired paper and inks because you never know!). I decided to use Cherry Cobbler.

I splattered the cards with black and gold ink. Then I re-stamped and embossed the sentiment on vellum, and adhered it using adhesive dots. The metallic sentiment was adhered with Tombow Mono liquid glue. Lastly I added a few large gold gems.
So, that's all for today! I hope this inspires you to pick up a marker, paintbrush, or pencil and create something!

Comments